Snowflake
Deprecated: The current method of Connecting is scheduled to be replaced by using-Upload Method
The following steps enable users to connect Single Origin to Snowflake.
Service Account
Single Origin Connector
To begin, log in as an ACCOUNTADMIN in Snowflake and create a user account for Single Origin:
- This user account will only be used by the Single Origin Connector. The user account can be assigned a role with varying levels of privileges (see three options below).
- You must log in as an admin in Snowflake to create roles and user accounts.
The Snowflake SQL examples below will help create an account and role, but any existing account and role with sufficient privileges can be used.
Snowflake SQL ExamplesThere are multiple options for creating a Snowflake role for the Single Origin Connector account to use:
- Option 1 (no dataset profiling, no cost saving automation): creates an account for the Single Origin Connector to access Snowflake's pre-defined ACCOUNT_USAGE schema
- Option 2 (no dataset profiling, no cost saving automation): creates an account for the Single Origin Connector with minimal privileges to collect schema metadata and support semantic management
- Option 3 (dataset profiling): in addition to the above, enable the account to
- read privilege on INFORMATION_SCHEMA and other metadata tables
- a compute WAREHOUSE so can SELECT data related to table profiling e.g. what is number of rows in table, what is the storage size of the table, when was table created, when was table last updated
- Option 4(cost saving plan automation): in addition to the above, give the account admin privileges to . For more information, see Cost Saving Plan.
-- Create an account for Single Origin to use with only account_usage access.
-- See more here: https://docs.snowflake.com/en/sql-reference/account-usage
-- Password (so_password) must be provided.

USE ROLE ACCOUNTADMIN;

SET so_username= 'SINGLE_ORIGIN_SERVICE';
-- TODO: Fill password
SET so_password= <PASSWORD HERE>;
SET so_role= 'SINGLE_ORIGIN_ACCOUNT_USAGE_ROLE';

CREATE ROLE IF NOT EXISTS identifier($so_role);

GRANT IMPORTED PRIVILEGES ON DATABASE SNOWFLAKE TO ROLE identifier($so_role);
-- TODO: Fill warehouse
GRANT USAGE ON WAREHOUSE <WAREHOUSE NAME HERE> TO ROLE identifier($so_role);
GRANT ALL PRIVILEGES ON ALL TABLES IN SCHEMA SNOWFLAKE.ACCOUNT_USAGE TO ROLE identifier($so_role);

CREATE USER identifier($so_username) PASSWORD=$so_password DEFAULT_ROLE=$so_role;
GRANT ROLE identifier($so_role) TO USER identifier($so_username);
-- Create an account for Single Origin to collect only schema metadata.
-- No warehouse is needed to ensure that no data will be read besides schema.
-- Password (so_password) and Target database (target_db) must be provided.
USE ROLE ACCOUNTADMIN;
SET so_username= 'SINGLE_ORIGIN_SERVICE';
-- TODO: Fill password
SET so_password= <PASSWORD HERE>;
SET so_role= 'SINGLE_ORIGIN_ROLE';
CREATE ROLE IF NOT EXISTS identifier($so_role);
-- Grant permission to normal databases, replace target_db with all databases Single Origin can index for metadata.
-- TODO: Fill target database to grant permissions
SET target_db = <DATABASE NAME HERE>;
GRANT IMPORTED PRIVILEGES ON DATABASE SNOWFLAKE TO ROLE identifier($so_role);
GRANT USAGE ON DATABASE identifier($target_db) TO ROLE identifier($so_role);
GRANT ALL PRIVILEGES ON ALL TABLES IN SCHEMA SNOWFLAKE.ACCOUNT_USAGE TO ROLE identifier($so_role);
GRANT REFERENCES ON ALL TABLES IN DATABASE identifier($target_db) to ROLE identifier($so_role);
GRANT REFERENCES ON FUTURE TABLES IN DATABASE identifier($target_db) to ROLE identifier($so_role);
GRANT REFERENCES ON ALL EXTERNAL TABLES IN DATABASE identifier($target_db) to ROLE identifier($so_role);
GRANT REFERENCES ON FUTURE EXTERNAL TABLES IN DATABASE identifier($target_db) to ROLE identifier($so_role);
GRANT REFERENCES ON ALL VIEWS IN DATABASE identifier($target_db) to ROLE identifier($so_role);
GRANT REFERENCES ON FUTURE VIEWS IN DATABASE identifier($target_db) to ROLE identifier($so_role);
GRANT USAGE ON ALL SCHEMAS in DATABASE identifier($target_db) TO ROLE identifier($so_role);
GRANT USAGE ON FUTURE SCHEMAS IN DATABASE identifier($target_db) to ROLE identifier($so_role);
-- Create Single Origin user and grant only Single Origin role with minimal requirements
CREATE USER identifier($so_username) PASSWORD=$so_password DEFAULT_ROLE=$so_role;
GRANT ROLE identifier($so_role) TO USER identifier($so_username);-- Create an account for Single Origin to collect schema metadata and prolfile datasets.
-- Password (so_password) and Target database (target_db) must be provided.
USE ROLE ACCOUNTADMIN;
SET so_username= 'SINGLE_ORIGIN_SERVICE';
-- TODO: Fill password
SET so_password= <PASSWORD HERE>;
SET so_role= 'SINGLE_ORIGIN_ROLE';
CREATE ROLE IF NOT EXISTS identifier($so_role);
-- Grant permission to normal databases, replace target_db with all databases Single Origin can index for metadata.
-- TODO: Fill target database to grant permissions
SET target_db = <DATABASE NAME HERE>;
GRANT IMPORTED PRIVILEGES ON DATABASE SNOWFLAKE TO ROLE identifier($so_role);
GRANT USAGE ON DATABASE identifier($target_db) TO ROLE identifier($so_role);
GRANT ALL PRIVILEGES ON ALL TABLES IN SCHEMA SNOWFLAKE.ACCOUNT_USAGE TO ROLE identifier($so_role);
GRANT REFERENCES ON ALL TABLES IN DATABASE identifier($target_db) to ROLE identifier($so_role);
GRANT REFERENCES ON FUTURE TABLES IN DATABASE identifier($target_db) to ROLE identifier($so_role);
GRANT REFERENCES ON ALL EXTERNAL TABLES IN DATABASE identifier($target_db) to ROLE identifier($so_role);
GRANT REFERENCES ON FUTURE EXTERNAL TABLES IN DATABASE identifier($target_db) to ROLE identifier($so_role);
GRANT REFERENCES ON ALL VIEWS IN DATABASE identifier($target_db) to ROLE identifier($so_role);
GRANT REFERENCES ON FUTURE VIEWS IN DATABASE identifier($target_db) to ROLE identifier($so_role);
GRANT USAGE ON ALL SCHEMAS in DATABASE identifier($target_db) TO ROLE identifier($so_role);
GRANT USAGE ON FUTURE SCHEMAS IN DATABASE identifier($target_db) to ROLE identifier($so_role);
-- Create Single Origin user and grant only Single Origin role with minimal requirements
CREATE USER identifier($so_username) PASSWORD=$so_password DEFAULT_ROLE=$so_role;
GRANT ROLE identifier($so_role) TO USER identifier($so_username);
-- To run profiling, the role needs a warehouse and select privileges.
GRANT SELECT ON ALL TABLES IN DATABASE identifier($target_db) to ROLE identifier($so_role);
GRANT SELECT ON FUTURE TABLES IN DATABASE identifier($target_db) to ROLE identifier($so_role);
GRANT SELECT ON ALL EXTERNAL TABLES IN DATABASE identifier($target_db) to ROLE identifier($so_role);
GRANT SELECT ON FUTURE EXTERNAL TABLES IN DATABASE identifier($target_db) to ROLE identifier($so_role);
GRANT SELECT ON ALL VIEWS IN DATABASE identifier($target_db) to ROLE identifier($so_role);
GRANT SELECT ON FUTURE VIEWS IN DATABASE identifier($target_db) to ROLE identifier($so_role);
SET so_warehouse_size='XSMALL';
SET so_warehouse_name= 'SINGLE_ORIGIN_WH';
-- Create warehouse for Single Origin workload
CREATE WAREHOUSE IF NOT EXISTS identifier($so_warehouse_name) WAREHOUSE_SIZE=$so_warehouse_size INITIALLY_SUSPENDED=TRUE
AUTO_SUSPEND = 5 AUTO_RESUME = TRUE;
-- Grant permissions to use the new warehouse
GRANT OPERATE, USAGE, MONITOR ON WAREHOUSE identifier($so_warehouse_name) TO ROLE identifier($so_role);-- Create an account for Single Origin to collect schema metadata, prolfile datasets, and
-- generate cost saving plans.
-- Password (so_password) and Target database (target_db) must be provided.
USE ROLE ACCOUNTADMIN;
SET so_username= 'SINGLE_ORIGIN_SERVICE';
-- TODO: Fill password
SET so_password= <PASSWORD HERE>;
SET so_role= 'SINGLE_ORIGIN_ROLE';
CREATE ROLE IF NOT EXISTS identifier($so_role);
-- Grant permission to normal databases, replace target_db with all databases Single Origin can index for metadata.
-- TODO: Fill target database to grant permissions
SET target_db = <DATABASE NAME HERE>;
GRANT IMPORTED PRIVILEGES ON DATABASE SNOWFLAKE TO ROLE identifier($so_role);
GRANT USAGE ON DATABASE identifier($target_db) TO ROLE identifier($so_role);
GRANT ALL PRIVILEGES ON ALL TABLES IN SCHEMA SNOWFLAKE.ACCOUNT_USAGE TO ROLE identifier($so_role);
GRANT REFERENCES ON ALL TABLES IN DATABASE identifier($target_db) to ROLE identifier($so_role);
GRANT REFERENCES ON FUTURE TABLES IN DATABASE identifier($target_db) to ROLE identifier($so_role);
GRANT REFERENCES ON ALL EXTERNAL TABLES IN DATABASE identifier($target_db) to ROLE identifier($so_role);
GRANT REFERENCES ON FUTURE EXTERNAL TABLES IN DATABASE identifier($target_db) to ROLE identifier($so_role);
GRANT REFERENCES ON ALL VIEWS IN DATABASE identifier($target_db) to ROLE identifier($so_role);
GRANT REFERENCES ON FUTURE VIEWS IN DATABASE identifier($target_db) to ROLE identifier($so_role);
GRANT USAGE ON ALL SCHEMAS in DATABASE identifier($target_db) TO ROLE identifier($so_role);
GRANT USAGE ON FUTURE SCHEMAS IN DATABASE identifier($target_db) to ROLE identifier($so_role);
-- Create Single Origin user and grant only Single Origin role with minimal requirements
CREATE USER identifier($so_username) PASSWORD=$so_password DEFAULT_ROLE=$so_role;
GRANT ROLE identifier($so_role) TO USER identifier($so_username);
-- To run profiling, the role needs a warehouse and select privileges.
GRANT SELECT ON ALL TABLES IN DATABASE identifier($target_db) to ROLE identifier($so_role);
GRANT SELECT ON FUTURE TABLES IN DATABASE identifier($target_db) to ROLE identifier($so_role);
GRANT SELECT ON ALL EXTERNAL TABLES IN DATABASE identifier($target_db) to ROLE identifier($so_role);
GRANT SELECT ON FUTURE EXTERNAL TABLES IN DATABASE identifier($target_db) to ROLE identifier($so_role);
GRANT SELECT ON ALL VIEWS IN DATABASE identifier($target_db) to ROLE identifier($so_role);
GRANT SELECT ON FUTURE VIEWS IN DATABASE identifier($target_db) to ROLE identifier($so_role);
SET so_warehouse_size='XSMALL';
SET so_warehouse_name= 'SINGLE_ORIGIN_WH';
-- Create warehouse for Single Origin workload
CREATE WAREHOUSE IF NOT EXISTS identifier($so_warehouse_name) WAREHOUSE_SIZE=$so_warehouse_size INITIALLY_SUSPENDED=TRUE
AUTO_SUSPEND = 5 AUTO_RESUME = TRUE;
-- Grant permissions to use the new warehouse
GRANT OPERATE, USAGE, MONITOR ON WAREHOUSE identifier($so_warehouse_name) TO ROLE identifier($so_role);
-- Grant admin role for cost saving plan automation
GRANT ROLE ACCOUNTADMIN TO USER identifier($so_username);Once the account has been created, a Single Origin user with the Admin role can input the account credentials in the Single Origin portal:
- Navigate to "Mission Control > Single Origin Connectors" and add a new Single Origin connector for Datastore
Snowflake. - Input a name for the connector (what you would like to call it).
- Input the Username and Password from above. In the example above, the Username is
SINGLE_ORIGIN_SERVICE. - Input your server name ending with
.snowflakecomputing.com - Input the Warehouse (
target_db) and role (so_role) to use. For more on warehouses, see here. - Click "Test" to test the connector; if successful, then "Save."
NoteSnowflake connection parameters like Username can be case sensitve, and some parameters are often capitalized in Snowflake by default. When inputting parameters into the Single Origin app, make sure they are in the proper case.
Personal Connector (Optional)
Note
- To create a Data Entity, the logged in user must provide an account with sufficient privileges to reference the table schemas.
- To query a Data Entity, the logged in user must provide an account with sufficient SELECT privileges to query the underlying tables in Snowflake.
Once a Single Origin connector is set up, users can set up (and modify) personal connectors using their Username and Password. Setting up a personal connector is similar to setting up a Single Origin connector above:
- Navigate to "Mission Control > Personal Connectors."
- Add a new connector, and specify a type of
Snowflake user pass. - Input a name for the connector (what you would like to call it).
- Input your Username and Password.
- Input your server name ending with
.snowflakecomputing.com. This should be the same as the Single Origin connector. - Input the warehouse and role you use to operate on your data in Snowflake - these likely match those set up in Service Account above.
- Click "Test" to test the connector; if successful, then "Save."
OAuth Integration (Optional)
If you are using SSO to log into Snowflake or would like to use OAuth to connect to Snowflake, you can set up OAuth in Single Origin.
NoteWith OAuth delegation, Single Origin will require users to re-authenticate in order to refresh the tokens when they expire.
Your Snowflake account must enable OAuth: see Snowflake OAuth Documentation. Once OAuth is enabled, then to integrate Snowflake OAuth with Single Origin, a Snowflake user with ACCOUNTADMIN role must perform the following two steps:
- In Snowflake, create a security integration with Single Origin. Run the following SQL, but replace
{tenant}with your Single Origin instance.
CREATE OR REPLACE SECURITY INTEGRATION SINGLE_ORIGIN
  TYPE = OAUTH
  ENABLED = TRUE
  OAUTH_CLIENT = CUSTOM
  OAUTH_CLIENT_TYPE = 'CONFIDENTIAL'
  OAUTH_REDIRECT_URI = 'https://{tenant}.singleorigin.tech/api/connectors/oauth/snowflake'
  OAUTH_ISSUE_REFRESH_TOKENS = TRUE
  OAUTH_REFRESH_TOKEN_VALIDITY = 7776000;

WITH oauth_client AS (
  SELECT parse_json(system$show_oauth_client_secrets('SINGLE_ORIGIN')) AS client_secrets
)
SELECT
  client_secrets:"OAUTH_CLIENT_ID"::string     AS client_id,
  client_secrets:"OAUTH_CLIENT_SECRET"::string AS client_secret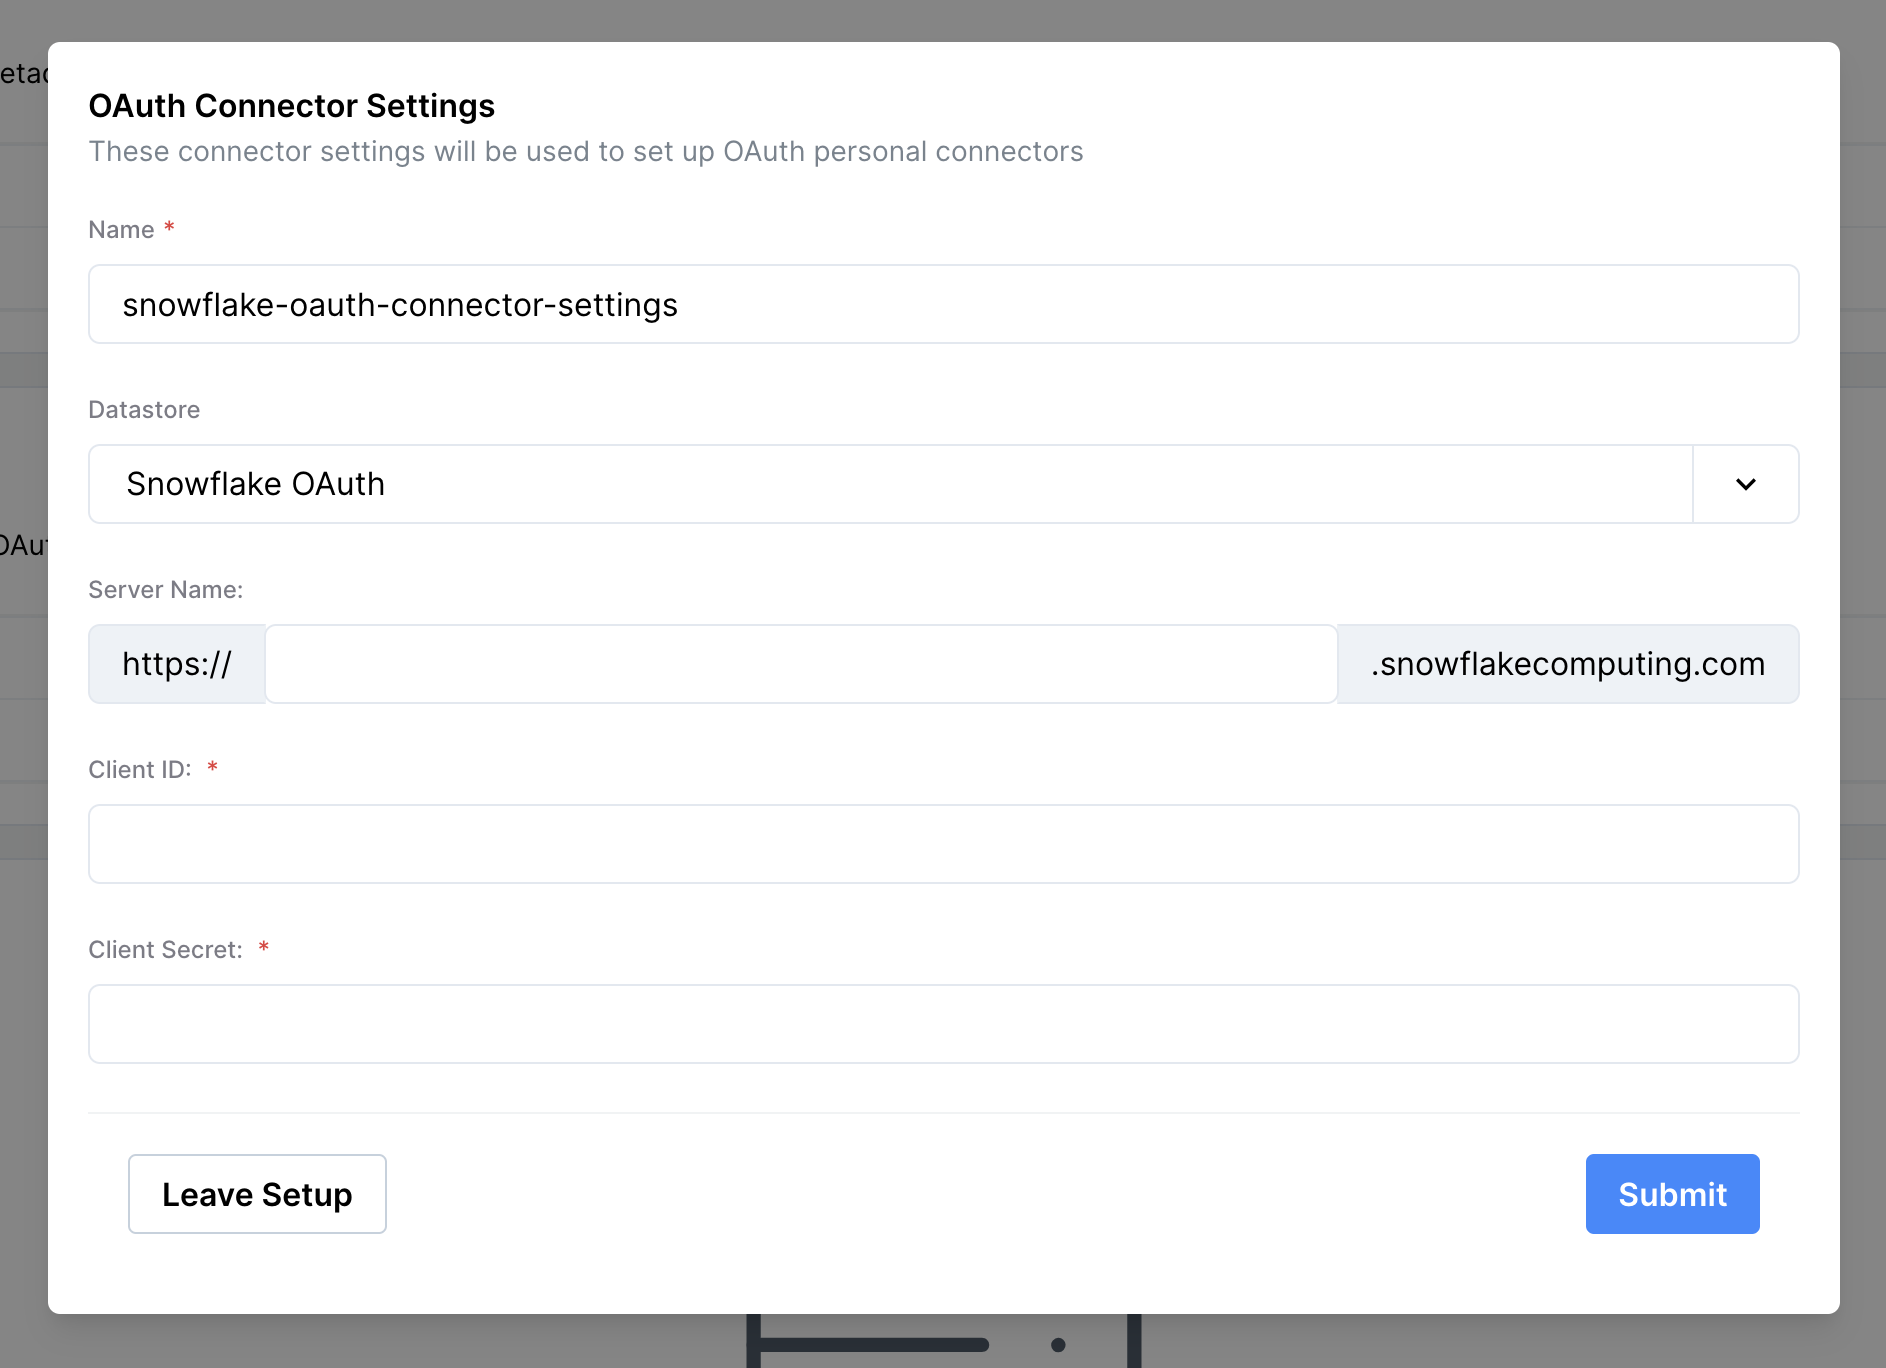
FROM oauth_client;- In Single Origin, navigate to "Mission Control > Single Origin Connectors > Connector Settings." Copy and paste the
client_idandclient_secretfrom the previous step into the setting form.
Once this is complete, Admins have configured the required OAuth information in Snowflake to:
- setup a Single Origin connector, as well as
- allow users to set up personal connectors with OAuth.
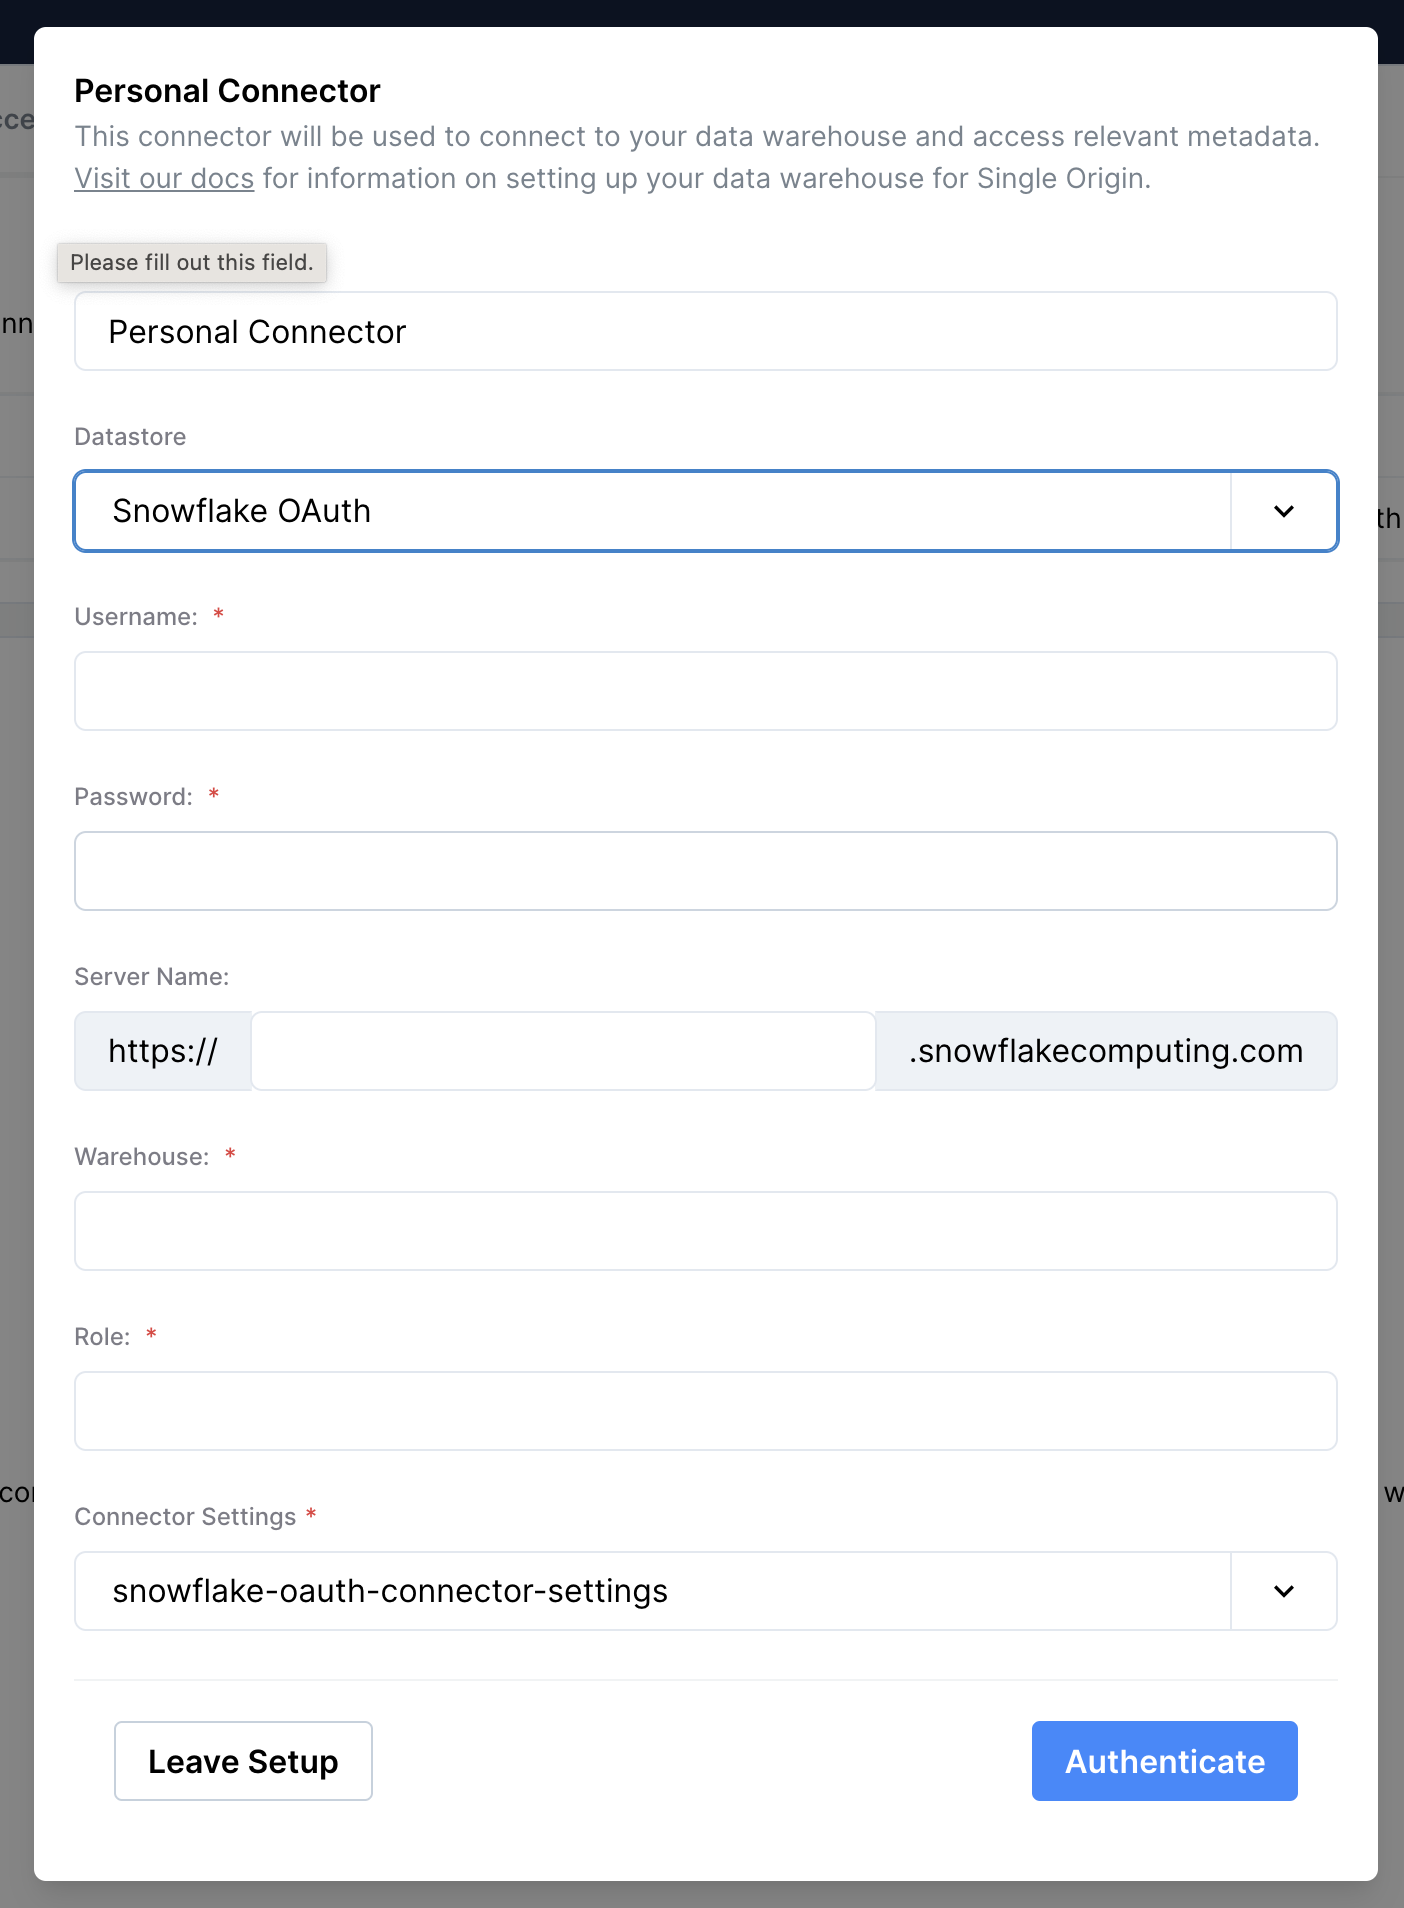
An admin can set up a Single Origin connector of type Snowflake OAuth with the connector settings created above. After this, any user that would like to set up a personal connector needs to:
- Navigate to "Mission Control > Personal Connectors"
- Click "New"
- Select type of
Snowflake OAuth, and select the connector settings set up by the admin above. - Input a Name, Warehouse, and Role.
- Click "Authenticate with Snowflake"
RolesSnowflake OAuth blocks certain roles from being used. You cannot use the following roles:
- ACCOUNTADMIN
- SECURITYADMIN
- ORGADMIN
You also cannot use any roles that you added to your BLOCKED_ROLES_LIST when creating the OAuth Integration.
Updated 8 months ago